Making a lofi compressor plugin based off tutorials
August 30, 2021TL;DR: Edit, expand, and combine tutorials to create something novel.
Last month I made a lofi compressor plugin using JUCE (a C++ framework specializing in audio applications). I did this by following the tutorials on the official JUCE website. This doesn't sound very impressive, I know, except for the fact that there aren't any guides on how to make something lofi, nor any on how to make a compressor. How did I do this? I leveraged the existing tutorials to fit what I wanted to make.
This was my way to escape tutorial hell.
My definition of tutorial hell is this:
The ability to follow a guide and understand the material only in that context. All or most knowledge is lost when it comes to applying it outside of where it was learned.
One example of this would be someone taking a class on making your own website, doing well in it, then leaving the class and not being able to actually make their own website.
There are plenty of ways to avoid tutorial hell, like reproducing the tutorial from memory until you get stuck. When you do have to look up what to do next, you do it, then restart from the beginning. By the time you can work through the entire thing yourself from memory you'll have such an ingrained understanding of what to do that you won't need it anymore.
For me, personally, that's a bit too tedious. I like to avoid getting stuck in the tutorial loop by using my edit-expand-combine (EEC) methodology.
Tutorials aren't always bad. A lot of the time it pays to follow them when learning about something for the first time. However, they should be generally viewed as something you work through quickly to gain enough understanding to start doing things on your own.
I view them as a tool to gain enough knowledge to be able to use the documentation more effectively.
The first part of EEC is edit. What I mean by this is take a tutorial and change (or edit) some aspect(s) of it. Simple enough.
I began to learn about the Digital Signal Processing (DSP) module of JUCE through the introductory tutorial where they used several different components of the DSP module to build a synthesizer.
Instead of following the tutorial exactly as it's laid out, I adopted the general process they outlined instead. The only difference was that I used the compressor class.
They didn't mention the compressor class at all in the tutorial, so I had to have the documentation for it up and handy. But rather than being stuck with just a bunch of class methods and properties, I was able to follow the same structure and steps they did for making a synth.
The tutorial talks about using the ProcessorChain in order to "bundle" together all the things that are needed to add or change the audio:
enum
{
  oscIndex,
  gainIndex
};

juce::dsp::ProcessorChain<juce::dsp::Oscillator<Type>, juce::dsp::Gain<Type>> processorChain;
Instead of an Oscillator and Gain processor, I wanted to make a compressor where we can control the input gain, all the parameters of a regular compressor, and the makeup gain. So I modified the above code to this:
enum
{
  inputGainIdx,
  compressorIdx,
  makeupGainIdx
};

juce::dsp::ProcessorChain<juce::dsp::Gain<Type>, juce::dsp::Compressor<Type>, juce::dsp::Gain<Type>> processorChain;
I was able to follow along with the rest of the tutorial and adjust for my project as needed. For example, when the tutorial was handling the setting of the gain level:
auto& gain = processorChain.template get<gainIndex>();
gain.setGainLinear (newValue);
I was able to do the same with my parameters:
auto& inputGain = processorChain.template get<inputGainIdx>();
auto& compressor = processorChain.template get<compressorIdx>();
auto& makeupGain = processorChain.template get<makeupGainIdx>();

inputGain.setGainDecibels(treeState.getRawParameterValue(INPUTGAIN_ID)->load());
compressor.setThreshold(treeState.getRawParameterValue(THRESHOLD_ID)->load());
compressor.setRatio(treeState.getRawParameterValue(RATIO_ID)->load());
compressor.setAttack(treeState.getRawParameterValue(ATTACK_ID)->load()*1000); // Convert to milliseconds
compressor.setRelease(treeState.getRawParameterValue(RELEASE_ID)->load()*1000); // Convert to milliseconds
makeupGain.setGainDecibels(treeState.getRawParameterValue(MAKEUPGAIN_ID)->load());
After writing up the UI I was happy to discover that it just worked.
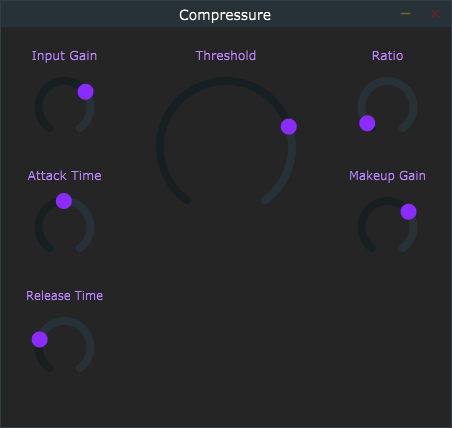
And just like that I had written a compressor plugin following a tutorial that was about creating a synth.
To expand a tutorial is to take what is shown or taught and further it using your own knowledge or ideas.
The differences between editing and expanding a tutorial are subtle, but important. With editing, you still follow the general outline shown in the tutorial. This isn't the (entire) case with expanding. As the name suggests, you'll be using your own creative insights to take what's shown even further. The original tutorial is still valuable, but more as a foundation for you to build on.
I used this principle to add a classic lofi feature to my compressor: dust. Dust, in the context of music, is just noise. It's that scratchy, failing-electronics sound you might hear on an old record. It gives the music a ✨nostalgic✨ quality.
To start off, I followed the JUCE tutorial, making a white noise generator and added it to my existing compressor plugin. The code they provide to make the white noise is this:
void getNextAudioBlock (const AudioSourceChannelInfo& bufferToFill) override
{
  for (auto channel = 0; channel < bufferToFill.buffer->getNumChannels(); ++channel)
  {
    auto* buffer = bufferToFill.buffer->getWritePointer (channel, bufferToFill.startSample);

    for (auto sample = 0; sample < bufferToFill.numSamples; ++sample)
      buffer[sample] = random.nextFloat() * 0.25f - 0.125f;
  }
}
At this point I had a compressor plugin where the white noise generator was always on. This wasn't exactly what I was looking for, but it was a good start!
To get to what I wanted I had to expand what was taught during the tutorial to:
For point 2 what I mean is rather than the white noise being constantly on, I would instead give the user control over the chance of a "speck" of dust occurring. This would let the user go from dust happening every few seconds to constant white noise.
Adding point 1, the dust level control, is simple enough. I added a parameter that the user can control on the front end and had that scale the random value used for white noise:
auto noiseLevel = treeState.getRawParameterValue(DUSTDEPTH_ID)->load()/1000;
// Divide by 1000 to scale to reasonable level

for (int channel = 0; channel < totalNumInputChannels; ++channel)
{
  auto* channelData = buffer.getWritePointer(channel);
  for (auto sample = 0; sample < buffer.getNumSamples(); ++sample)
  {
    auto noise = random.nextFloat() * noiseLevel - noiseLevel;
    channelData[sample] = buffer.getSample(channel, sample) + noise;
  }
}
Allowing the user to control the chance of this white noise happening was a bit more tricky.
To start, I spent some time experimenting to find out how many samples in a row it would take to produce good sounding dust. The number ended up being 200 samples. If I wanted to, I could have made the number of samples per dust speck be somewhat random, but ultimately I decided against it.
So instead of applying the white noise to every sample, we'll only do it for 200 samples in a row as a speck of dust. The number of samples that the dust has been playing for is stored in a variable I call currentDustSampleNum.
In order to add some randomness to when the dust occurs I made a parameter that the user controls called noiseSpacing. Increasing this means that there's more time between dust specks.
The logic for when dust should be applied on a sample-by-sample basis is simple:
currentDustSampleNum = 0) then roll a chance of dust startingcurrentDustSampleNumcurrentDustSampleNumWriting that out we get this:
auto noiseLevel = treeState.getRawParameterValue(DUSTDEPTH_ID)->load()/1000; // Scale to reasonable level
auto noiseSpacing = treeState.getRawParameterValue(DUSTRATE_ID)->load();

for (int channel = 0; channel < totalNumInputChannels; ++channel)
{
  auto* channelData = buffer.getWritePointer(channel);

  for (auto sample = 0; sample < buffer.getNumSamples(); ++sample)
  {
    // If we're above the max length for the dust, then reset it
    // If we're in the middle of dust, then continue
    // If we're not then roll a chance of dust starting
    if (currentDustSampleNum > 200)
    {
      currentDustSampleNum = 0;
    } else if (currentDustSampleNum > 0) {
      auto noise = random.nextFloat() * noiseLevel - noiseLevel;
      channelData[sample] = buffer.getSample(channel, sample) + noise;
      currentDustSampleNum++;
    } else {
      auto dustChance = (1 / pSampleRate) * (1 / noiseSpacing);
      auto randNum = random.nextFloat();
      if (randNum < dustChance) {
        currentDustSampleNum++;
      }
    }
  }
}
I then hooked up the UI and gave the dust settings a different color.
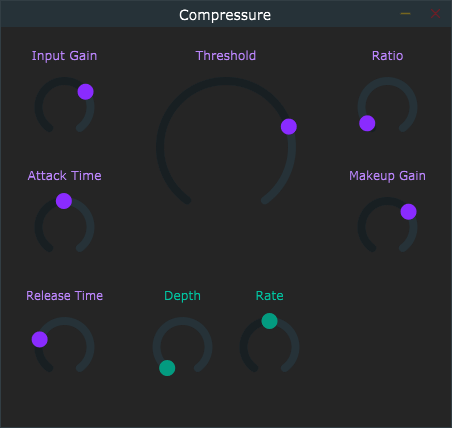
Looking back I now realize that I should have renamed the "Rate" knob to something more intuitive, like "Time". And maybe added some text indicating those are Depth and Time settings for the duster. Oh well.
Expanding tutorials is very gratifying. You can get a lot done with a strong foundation, but at the same time so much of what is accomplished is your own work!
The last part of EEC is combine. This one is self-explanatory: combine multiple tutorials into one. This can be parts of tutorials, the entirety of them, or any combination of each as you see fit.
Really, this should have been the second method I talked about, since I already combined the duster in the expand section with the compressor from the edit section. Unfortunately, ECE is generally known to stand for Electrical and Computer Engineering, so I'll talk about it last instead.
Even though I combined two tutorials to make what I have so far, I'll add in a new example to give some extra lofi character. In the tutorial add distortion through waveshaping and convolution there's one part that talks about using an impulse response to make a synthesizer sound like it's being run through a guitar amplifier. Luckily for me, they also provided the impulse response for a cassette recorder.
I took the code they have for their guitar cabinet simulator and modified it to use the cassette impulse response:
dir = juce::File::getCurrentWorkingDirectory();
int numTries = 0;

while(!dir.getChildFile("Resources").exists() && numTries++ < 15)
  dir = dir.getParentDirectory();

convolution.loadImpulseResponse(dir.getChildFile("Resources").getChildFile("cassette_recorder.wav"),
     juce::dsp::Convolution::Stereo::yes,
     juce::dsp::Convolution::Trim::no,
     1024);
I ended up replacing the processorChain from the edit section, so I had to manually call the the process method in my Convolution processor:
this->convolution.process(juce::dsp::ProcessContextReplacing<float>(sampleBlock));
And it works! The last thing to do was set it up so that the user can control how much of the cassette effect to use. I did this by copying the audio buffer before adding the cassette effect, processing the signal, then using the JUCE processor class, DryWetMixer:
dryBuffer.makeCopyOf(buffer);
this->convolution.process(juce::dsp::ProcessContextReplacing<float>(sampleBlock));
dryWetMixer.pushDrySamples(dryBuffer);
dryWetMixer.mixWetSamples(buffer);
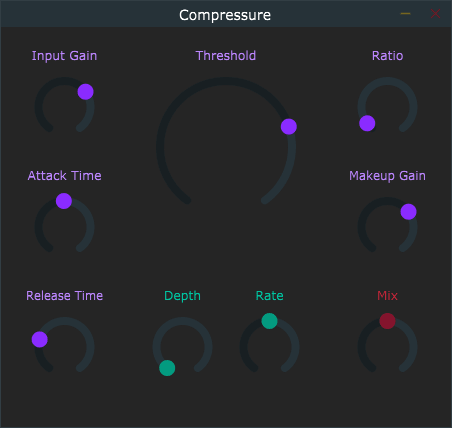
Updating the UI results in the final product:
The biggest takeaway from this is that if you want to breakthrough the tutorial hell barrier, you should make something yourself, not just follow along with someone else. Applying new knowledge will cause you to retain and understand it better than simply reading it.
The easiest way to accomplish this is to use existing tutorials as guides for making what you want rather than starting a project from a blank slate and instead of following a tutorial exactly.