Coding one from basic reasoning
July 9, 2021TL;DR: I coded a digital audio compressor and I'll break down how I did it. All of the math was derived myself based on how compressors operate. It's not perfect, but it works!
Not too long ago I came up with an idea for a software synthesizer. One that's different enough from what's out there to warrant actually spending some time on it. It’s a quirky idea that I thought would be fun to make, teach me a lot, and result in something that may be valuable to people. So I started researching how to create one.
After some time I ultimately decided on the C++ framework, JUCE. It's low-level enough to let me program my own algorithms, but removes a lot of the annoyances of building GUIs and multi-platform software.
I was working through a few tutorials to get familiar with the framework when I realized just how far away I am from making my own synth…so I took a detour. I decided my first project with JUCE would instead be a compressor.
Have you ever been watching a movie where the dialog is too quiet, but the action is too loud? Well, a compressor can fix that. A compressor takes an audio signal, and makes the loud parts closer in volume to the quieter parts.
It does other things, but at its core an audio compressor makes loud things quieter.
Believe it or not, making loud things quiet is incredibly important to music. Not just for the song as a whole, but to the individual instruments. A compressor can make a musicians playing sound more consistent by making the volume of it more even. In addition, the compressor itself can give some coloring to the sound.
Given its importance, I thought that it would be a great opportunity to master it myself. So for this project I'm going to create a compressor plugin based entirely on common sense and basic reasoning. I'm not going to derive complicated formulas like an audio engineering research paper from the 1990's, only simple equations that take a line or two.
The code shown here should be taken with a grain of salt. First, all of the functionality found in this plugin can be achieved more simply by using certain built-in JUCE modules. Secondly, I had to do a decent amount of rework to get the code snippets to look presentable within the constraints of the website.
What's shown here isn't necessarily an indication of how I actually wrote the code for this project, or how I write code for any of my projects in general.
There are two volume knobs on a compressor, one is usually labeled "Input Gain" and the other "Makeup Gain". Now, let's go back to the analogy of a movie. Imagine that you put the movie Titanic on and to your annoyance, it's too quiet! You have to turn your TV up in order to hear anything. After watching the movie, you decide to put on The Avengers, but *gasp* everything is too loud!
Your TVs volume has to be set to 25 for Titanic, but 15 for The Avengers…what gives? You could say that these two movies have different input gains. The input gain for The Avengers is higher, so you have to compensate by turning your TV down. If the input gain for each movie was the same then you wouldn't need to adjust the volume.
The input gain for the movie itself isn't adjustable, as a result you have to adjust the makeup gain, aka your TV volume. Since the input gain is lower for Titanic, you need to makeup the volume with your TV.
Relating this analogy back to the compressor, the input gain is a volume adjustment to the audio signal before any compression happens, and the makeup gain is how loud the final result of the signal is after compression.
Converting this into code is quite simple: just scale each sample [1] by the input gain amount and then the makeup gain amount.
void JUCEyCompressorAudioProcessor::processBlock (juce::AudioBuffer<float>& buffer, juce::MidiBuffer& midiMessages)
  {
    auto totalNumInputChannels  = getTotalNumInputChannels();
    auto totalNumOutputChannels = getTotalNumOutputChannels();
    auto inputGainDb = treeState.getRawParameterValue(INPUTGAIN_ID) -> load();
    auto makeupGainDb = treeState.getRawParameterValue(MAKEUPGAIN_ID) -> load();
    auto inputGain = juce::Decibels::decibelsToGain(inputGainDb);
    auto makeupGain = juce::Decibels::decibelsToGain(makeupGainDb);

    for (auto i = totalNumInputChannels; i < totalNumOutputChannels; ++i)
      buffer.clear (i, 0, buffer.getNumSamples());

    for (int channel = 0; channel < totalNumInputChannels; ++channel)
    {
      auto* channelData = buffer.getWritePointer (channel);

      for (int sample = 0; sample < buffer.getNumSamples(); ++sample)
      {
        channelData[sample] = channelData[sample] * inputGain;
        channelData[sample] = channelData[sample] * makeupGain;
      }
    }
  }
Luckily the code can be reduced by using a built-in function in JUCE, where a gain is applied to the entire buffer.[2]
void JUCEyCompressorAudioProcessor::processBlock (juce::AudioBuffer<float>& buffer, juce::MidiBuffer& midiMessages)
  {
    auto inputGainDb = treeState.getRawParameterValue(INPUTGAIN_ID) -> load();
    auto inputGain = juce::Decibels::decibelsToGain(inputGainDb);
    buffer.applyGain (inputGain);

    auto makeupGainDb = treeState.getRawParameterValue(MAKEUPGAIN_ID) -> load();
    auto makeupGain = juce::Decibels::decibelsToGain(makeupGainDb);
    buffer.applyGain (makeupGain);
  }
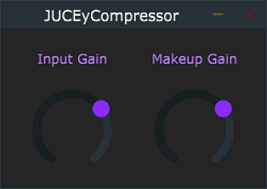
This results in a simple plugin that has two volume control knobs.
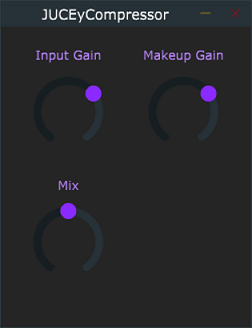
I added a mix knob to my compressor, mostly for testing purposes.
This knob controls how much of an effect the compressor has on the signal, as a whole. So if the mix knob is at 0%, then we won't hear the compressor at all; we'll only hear the original signal that's going into the compressor. If knob is at 100% then we'll hear the entirety of the compressor and none of the original signal.
A mix knob is useful for most audio effects, like reverberation and delay, but not so much for compression. However, it's nice to have a way for me to hear how the plugin is affecting the original signal while playing around with it.
To code this I'm going to copy the buffer and then scale the incoming signal based on the input and makeup gains like before. Then we go through each sample and scale it based on the mix percentage.
void JUCEyCompressorAudioProcessor::processBlock (juce::AudioBuffer<float>& buffer, juce::MidiBuffer& midiMessages)
  {
    dryBuffer.makeCopyOf(buffer);

    auto inputGainDb = treeState.getRawParameterValue(INPUTGAIN_ID) -> load();
    auto inputGain = juce::Decibels::decibelsToGain(inputGainDb);
    buffer.applyGain (inputGain);

    auto makeupGainDb = treeState.getRawParameterValue(MAKEUPGAIN_ID) -> load();
    auto makeupGain = juce::Decibels::decibelsToGain(makeupGainDb);
    buffer.applyGain (makeupGain);

    // convert from % to gain by /100
    auto amountOfWetMix = treeState.getRawParameterValue(MIX_ID) -> load() / 100;

    auto totalNumInputChannels  = getTotalNumInputChannels();
    auto totalNumOutputChannels = getTotalNumOutputChannels();

    for (auto i = totalNumInputChannels; i < totalNumOutputChannels; ++i)
    {
      buffer.clear (i, 0, buffer.getNumSamples());
      dryBuffer.clear (i, 0, buffer.getNumSamples());
    }

    for (int channel = 0; channel < totalNumInputChannels; ++channel)
    {
      auto* channelData = buffer.getWritePointer (channel);
      auto* dryChannelData = dryBuffer.getWritePointer (channel);

      for (int sample = 0; sample < buffer.getNumSamples(); ++sample)
      {
        // Scale each buffers data by the mix percent, then add them
        channelData[sample] = buffer.getSample(channel, sample) * amountOfWetMix;
        dryChannelData[sample] = dryBuffer.getSample(channel, sample) * (1 - amountOfWetMix);
        channelData[sample] = channelData[sample] + dryChannelData[sample];
      }
    }
  }
After building, we have this:
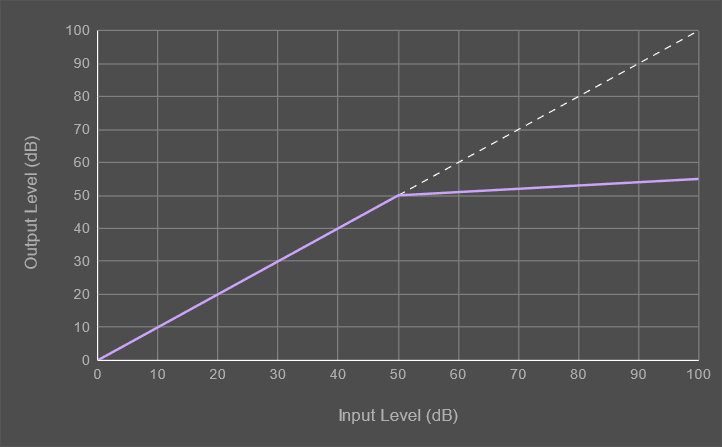
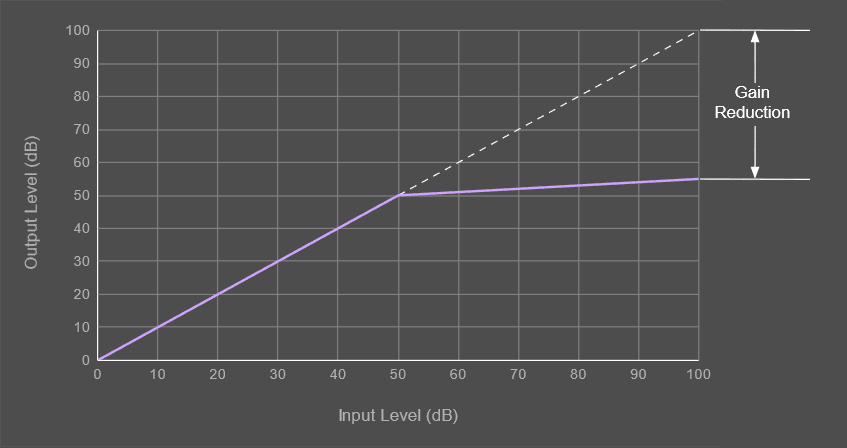
Going back to my original explanation for what a compressor is, I said it, "makes loud things quieter". At this point you may be thinking, "but how loud does something have to be before it gets quieter"? That point where the compression starts is called the threshold.
Anything above the threshold gets compressed and anything below it doesn't. The threshold can be moved all the way up (so nothing actually gets compressed), all the way down (so everything gets compressed), or anywhere in between.
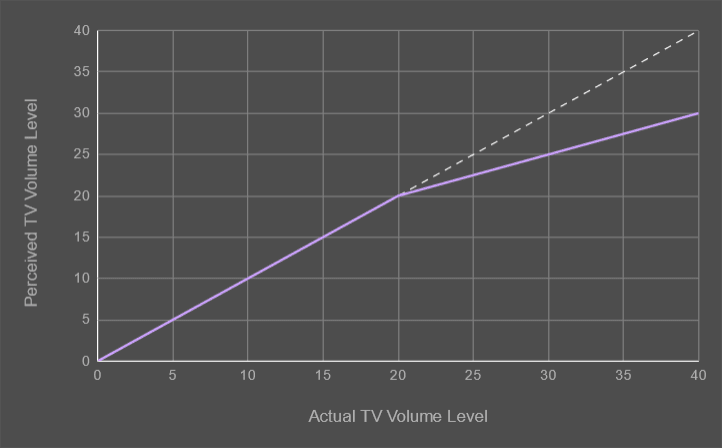
Let's return to the movie analogy. If your TV has its volume set to 20, but the action scenes are too loud, you might say the volume "sounds" like it's set to 25. Meanwhile, the dialog is too quiet and the TV volume of these parts "sound" like a setting of 15.
For this example you can set the threshold of your compressor to the TV volume setting of 20 as a starting point. Any parts of the movie that are loud and go above the 20 setting will be reduced in volume, while any parts that remain quiet, and below the 20 setting, won't be affected. In the chart below we're going to half the volume of the signal that's above our TV volume threshold of 20.
This is easy enough to code. For each sample check if its magnitude is above the threshold. If it is, then compress the portion of the signal that's above the threshold by half, and if it isn't, then don't do anything.
void JUCEyCompressorAudioProcessor::processBlock (juce::AudioBuffer<float>& buffer, juce::MidiBuffer& midiMessages)
  {
    dryBuffer.makeCopyOf(buffer);

    auto inputGainDb = treeState.getRawParameterValue(INPUTGAIN_ID) -> load();
    auto inputGain = juce::Decibels::decibelsToGain(inputGainDb);

    auto makeupGainDb = treeState.getRawParameterValue(MAKEUPGAIN_ID) -> load();
    auto makeupGain = juce::Decibels::decibelsToGain(makeupGainDb);

    auto thresholdDb = treeState.getRawParameterValue(THRESHOLD_ID) -> load();
    auto threshold = juce::Decibels::decibelsToGain(thresholdDb);

    auto amountOfWetMix = treeState.getRawParameterValue(MIX_ID) -> load() / 100;
    int ratio = 2;

    auto totalNumInputChannels  = getTotalNumInputChannels();
    auto totalNumOutputChannels = getTotalNumOutputChannels();

    for (auto i = totalNumInputChannels; i < totalNumOutputChannels; ++i)
    {
      buffer.clear (i, 0, buffer.getNumSamples());
      dryBuffer.clear (i, 0, buffer.getNumSamples());
    }

    for (int channel = 0; channel < totalNumInputChannels; ++channel)
    {
      auto* channelData = buffer.getWritePointer (channel);
      auto* dryChannelData = dryBuffer.getWritePointer (channel);

      for (int sample = 0; sample < buffer.getNumSamples(); ++sample)
      {
        // Add the input gain to the signal
        channelData[sample] = buffer.getSample(channel, sample) * inputGain;

        // If the sample is greather than the threshold, compress the signal
        if (channelData[sample] > threshold)
        {
          channelData[sample] = threshold + (channelData[sample] - threshold) * (1 / ratio);
        }
        // Add the makeup gain to the signal
        channelData[sample] = channelData[sample] * makeupGain;

        // Scale each buffers data by the mix percent, then add them
        channelData[sample] = channelData[sample] * amountOfWetMix;
        dryChannelData[sample] = dryBuffer.getSample(channel, sample) * (1 - amountOfWetMix);
        channelData[sample] = channelData[sample] + dryChannelData[sample];
      }
    }
  }
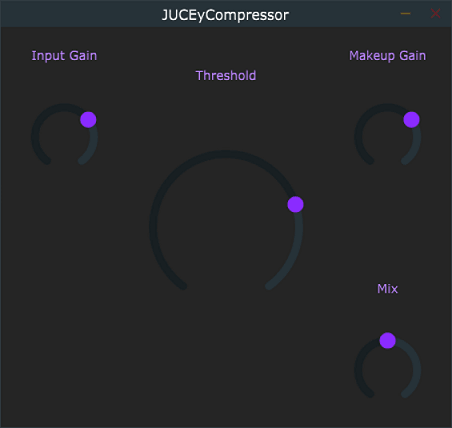
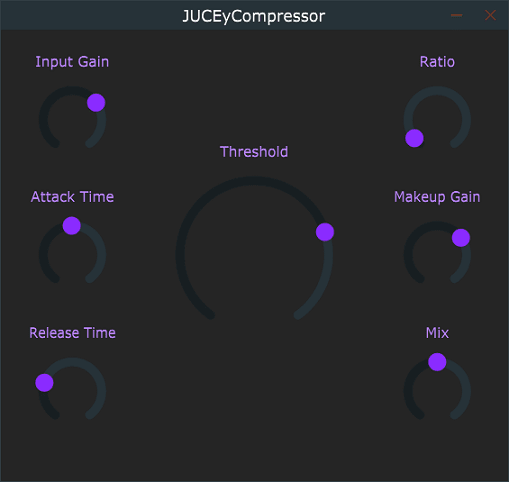
In order to liven up the layout of the plugin (and because threshold is usually used more often than other settings) I decided that its knob should stand out from the rest. So I made it very large. Building the plugin at this point results in this:
I wouldn't be doing you justice if I didn't break from my analogy to clarify one thing: the units associated with a compressor.
Up until this point I've been talking in terms of "TV Volume". If your TVs volume is set to 40, it's probably too loud, and if it's set to 5, then it's probably too quiet. A 20 on one TV may be louder than a 20 on a different kind. It all depends on the internal workings of the TV.
If you've been following the code snippets up to this point you may have noticed that I don't deal with TV volume. That's because compressors are more consistent; they measure things in decibels (dBs). A dB is a logarithmic[3] measure of the sound pressure level.
From this point forward I'll stick with using dB as the units in graphs.
Okay, back to the compressor.
At this point we can control the final volume of the movie we're hearing (makeup gain), the volume level at which things get quieter (threshold), and the loudness of the movie itself (input gain). But what if the loud parts of the movie aren't quiet enough?
We adjust the amount of loudness (gain) reduction after the threshold by setting the ratio.
In our previous graph we had a ratio of 2:1, meaning that for every 2 dB above the threshold we have, the result is only 1 dB above the threshold. What we're actually saying is that we want the volume above the threshold to be half of what it would normally be above the threshold, not half overall.
If we set a higher ratio, say 10:1, then it would take 10 dB above the threshold to get a compressor output of 1 dB above the threshold.
You can set the ratio to go from 1:1 (no compression) to ∞:1 (you'd actually be limiting[4] the sound to the threshold level, where nothing can get louder than that).
Adding this functionality is very simple. We make the ratio a variable controlled by the user on the plugin, instead of hardcoding a ratio of 2.
void JUCEyCompressorAudioProcessor::processBlock (juce::AudioBuffer<float>& buffer, juce::MidiBuffer& midiMessages)
  {
    dryBuffer.makeCopyOf(buffer);

    auto inputGainDb = treeState.getRawParameterValue(INPUTGAIN_ID) -> load();
    auto inputGain = juce::Decibels::decibelsToGain(inputGainDb);

    auto makeupGainDb = treeState.getRawParameterValue(MAKEUPGAIN_ID) -> load();
    auto makeupGain = juce::Decibels::decibelsToGain(makeupGainDb);

    auto thresholdDb = treeState.getRawParameterValue(THRESHOLD_ID) -> load();
    auto threshold = juce::Decibels::decibelsToGain(thresholdDb);

    auto amountOfWetMix = treeState.getRawParameterValue(MIX_ID) -> load() / 100;
    // The only new addition
    auto ratio = treeState.getRawParameterValue(RATIO_ID) -> load();

    auto totalNumInputChannels  = getTotalNumInputChannels();
    auto totalNumOutputChannels = getTotalNumOutputChannels();

    for (auto i = totalNumInputChannels; i < totalNumOutputChannels; ++i)
    {
      buffer.clear (i, 0, buffer.getNumSamples());
      dryBuffer.clear (i, 0, buffer.getNumSamples());
    }

    for (int channel = 0; channel < totalNumInputChannels; ++channel)
    {
      auto* channelData = buffer.getWritePointer (channel);
      auto* dryChannelData = dryBuffer.getWritePointer (channel);

      for (int sample = 0; sample < buffer.getNumSamples(); ++sample)
      {
        // Add the input gain to the signal
        channelData[sample] = buffer.getSample(channel, sample) * inputGain;

        // If the sample is greather than the threshold, compress the signal
        if (channelData[sample] > threshold)
        {
          channelData[sample] = threshold + (channelData[sample] - threshold) * (1 / ratio)
        }
        // Add the makeup gain to the signal
        channelData[sample] = channelData[sample] * makeupGain;

        // Scale each buffers data by the mix percent, then add them
        channelData[sample] = channelData[sample] * amountOfWetMix;
        dryChannelData[sample] = dryBuffer.getSample(channel, sample) * (1 - amountOfWetMix);
        channelData[sample] = channelData[sample] + dryChannelData[sample];
      }
    }
  }
What I've coded up thus far has been based purely on intuition; I've thought about how things should work and wrote them up as such. One common setting on a compressor that I won't be handling is the knee.
The knee determines what kind of a transition there is from nothing happening to compressing.
In the previous graphs the compressor has what's called a "hard" knee, meaning the transition between the compressor being on and off is sharp. A "soft" knee, however, has a smoother plot:
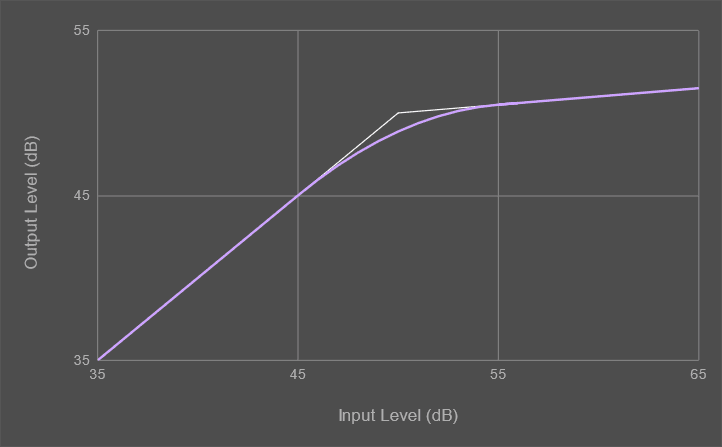
It provides a more gradual transition from no compression to compression. I wasn't sure how to model this based entirely off intuition…so I didn't.
The formula for a compressor knee itself isn't difficult to implement, but I wanted this compressor to be entirely from my own derivation.
At this point the compressor works: it reduces the volume of any signal above our desired threshold. The only problem is it doesn't sound good. If you were to listen to it in action then you would hear that any part of the audio signal that is compressed also has this unpleasant harmonic distortion. This is because the compressor works instantly.
As soon as a sample comes in above the threshold, it compresses it to its full amount. This is what causes the unpleasantness. To fix this I need to implement a way to have the compressor ramp up its compression over time.
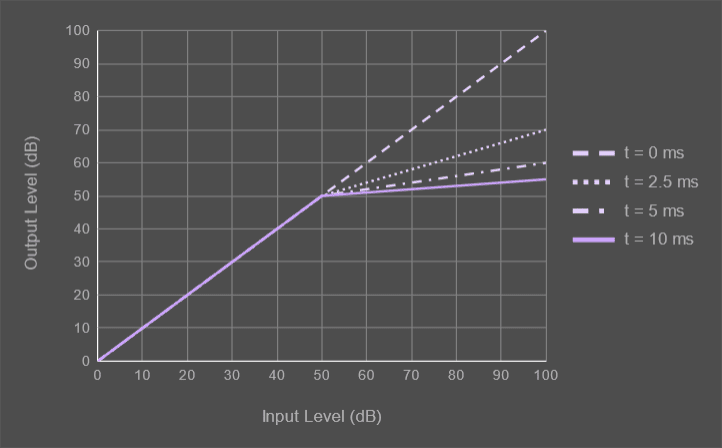
What I mean by that is having a way to control how fast the compressor goes from zero to complete compression once the threshold has been crossed. This speed is called the attack and it's measured in milliseconds; as in, the number of milliseconds it takes to get to full compression.[5]
The chart below illustrates this concept further; it shows how the compression plots change over time for a compressor with an attack time of 10 ms and a ratio of 10. When the first sample that is over the threshold is processed, there is no compression happening. The compressor hasn't ramped up at all yet. In the chart below, this is the t = 0 ms line. As more and more samples over the threshold are processed, more compression happens. At t = 2.5 ms we see that we're at about two-thirds of the maximum compression amount. Eventually, at t = 10 ms we're at the maximum compression amount.
We currently have a compressor with an attack of 0 ms since it takes no time for the compressor to get to its maximum compression amount. To make our compressor ramp up its compression amount we have to increase the percentage of compression for each sample that is over the threshold.
To do this we first figure out the percentage amount of gain reduction per sample for our attack time. We know how many samples are coming in every second (sample frequency) and we know how long it should take to get to max reduction (attack time). Multiplying those two together gives us the number of samples it would take to get to max gain reduction. The inverse of that is the percentage amount of gain reduction per sample.
// Calculate the percentage of the gain reduction per sample
auto gainReduxPerSample = 1.0f / (sampleFreq * attackTime);
Since we're ramping up our compression amount over time, we need a variable to store the cumulative percentage amount of gain that we're reducing by. Meaning, if this variable is 0 then we aren't compressing at all and if it's 1 then we're compressing at the maximum amount.
If we are below the threshold value, then this compression amount should be 0. However, for every sample that we're over the threshold, we should add our previously calculated 'gain reduction percentage per sample' to it.
if (std::abs(channelData[sample]) < threshold)
{
  cumulativeGainReduxPercent = 0.0f;
} else {
  cumulativeGainReduxPercent += gainReduxPerSample;
  // Don't let the gain reduction go above 100%
  cumulativeGainReduxPercent = std::min(cumulativeGainReduxPercent, 1.0f);
}
Once we have our cumulative gain reduction percentage, we can multiply that by our ratio to get the scaling factor for that sample. This scaling factor is our ratio for this sample. As the number of samples above the threshold increases, that scaling factor goes from 1 (no compression) to our ratio (full compression). Remember, a ratio of 1 means that 1 dB of input is required for 1 dB of output; meaning there is no change.
auto scaledRatio = ratio * cumulativeGainReduxPercent;
// Don't let the ratio get below 1
scaledRatio = std::max(1.0f, scaledRatio);
Next, we have to figure out the actual amount that we're going to reduce the sample by (gain reduction).
In order to determine the gain reduction amount we can subtract our equation for the compressor output level from the input signal. Rewritten, it looks like this:
gainRedux = (channelData[sample] - threshold) * (1 - (1 / scaledRatio));
The last thing we have to do is subtract the gain reduction amount from the sample. Put that all together and you get this:
// Calculate the percentage of the gain reduction per sample
auto gainReduxPerSample = 1.0f / (sampleFreq * attackTime);

for (int sample = 0; sample < buffer.getNumSamples(); ++sample)
{
  channelData[sample] = buffer.getSample(channel, sample) * inputGain;

  if (std::abs(channelData[sample]) < threshold)
  {
    cumulativeGainReduxPercent = 0.0f;
  } else {
    cumulativeGainReduxPercent += gainReduxPerSample;
    // Don't let the gain reduction go above 100%
    cumulativeGainReduxPercent = std::min(cumulativeGainReduxPercent, 1.0f);

    auto scaledRatio = ratio * cumulativeGainReduxPercent;
    // Don't let the ratio get below 1
    scaledRatio = std::max(1.0f, scaledRatio);

    gainRedux = (channelData[sample] - threshold) * (1 - (1 / scaledRatio));
    channelData[sample] -= gainRedux;
  }

  channelData[sample] *=  makeupGain;
  channelData[sample] *= amountOfWetMix;
  dryChannelData[sample] = dryBuffer.getSample(channel, sample) * (1 - amountOfWetMix);
  channelData[sample] += dryChannelData[sample];
}
Note: For brevity, the above code snippet only contains the code that is applied to each sample.
At this point we've removed most of that unwanted distortion from the compressor, but there's one problem…the compression isn't noticeable! The compressor isn't compressing for long enough for us to hear it unless the threshold is turned way down and the ratio is turned way up.
To fix this we'll set it up so that the compressor keeps working for some amount of time after the incoming samples magnitude drop below the threshold. This is called the release time.
To do this we have to reduce the incoming signal by our previous gain reduction amount. The gain reduction itself also has to reduce so we eventually aren't attenuating the incoming signal after our specified release time has passed.
To start, we can calculate the number of samples it will take to go from complete gain reduction to no reduction. This is the sample frequency multiplied by the release time, just like in our attack calculation. The inverse of this is the percentage of gain recovery per sample.
// Calculate the percentage of the gain recovery per sample
auto gainRecoveryPerSample = 1.0f / (sampleFreq * releaseTime);
Next, for every sample that is below the threshold we want to reduce the cumulative gain reduction percentage by our gain recovery (per sample) amount. What I mean by that is the effective ratio should be inching closer to 1 (no compression) for each sample below the threshold.
This is similar to how the attack is the time it takes for the compressor to go from a ratio of 1 to the selected ratio. The release time is the opposite. It's the time it takes for the compressor to go from a selected ratio to 1.
Next, we take our calculated gain reduction amount from when we were last over the threshold and subtract from it itself scaled by our gain recovery percentage per sample amount previously calculated. This will give us our new gain reduction amount.
The last thing to do is subtract the new gain reduction amount from the incoming sample.
// Calculate the percentage of the gain reduction per sample
auto gainReduxPerSample = 1.0f / (sampleFreq * attackTime);
auto gainRecoveryPerSample = 1.0f / (sampleFreq * releaseTime);

for (int sample = 0; sample < buffer.getNumSamples(); ++sample)
{
  channelData[sample] = buffer.getSample(channel, sample) * inputGain;

  if (std::abs(channelData[sample]) < threshold)
  {
    cumulativeGainReduxPercent -= gainRecoveryPerSample;
    cumulativeGainReduxPercent = std::max(cumulativeGainReduxPercent, 0.0f);
    gainRedux -= gainRedux * gainRecoveryPerSample;
    channelData[sample] -= gainRedux;
  } else {
    cumulativeGainReduxPercent += gainReduxPerSample;
    cumulativeGainReduxPercent = std::min(cumulativeGainReduxPercent, 1.0f);
    auto scaledRatio = ratio * cumulativeGainReduxPercent;
    scaledRatio = std::max(1.0f, scaledRatio);
    gainRedux = (channelData[sample] - threshold) * (1 - (1 / scaledRatio));
    channelData[sample] -= gainRedux;
  }
}
At this point everything should work…but doesn't. Our compressor still isn't compressing that much, and there's still some distortion.
The reason for this is due to how our gain reduction is calculated. If our signal is decreasing in magnitude, but still over the threshold, then the amount of gain reduction is also decreasing as the sample approaches the threshold.
If we have a ratio of 2:1 and we're 4 dB over the threshold, the gain reduction will be 2 dB. However, if we're 2 dB over the threshold then the gain reduction will be 1 dB. Once we get to the threshold, there is no gain reduction.
So we are essentially entering the release portion with a cumulative gain reduction of 0 dB!
To correct this we have to reduce the cumulative gain reduction by a small proportion for each sample that is smaller than the previous one.
To start, we change our current if-else condition to include an else-if conditional. It doesn't matter if our existing "above threshold and increasing in magnitude" compression logic is in the else-if or else, as long as the condition is set correctly
if (std::abs(channelData[sample]) < threshold)
{
  cumulativeGainReduxPercent -= gainRecoveryPerSample;
  cumulativeGainReduxPercent = std::max(cumulativeGainReduxPercent, 0.0f);
  cumulativeGainRedux -= cumulativeGainRedux * gainRecoveryPerSample;
  channelData[sample] -= cumulativeGainRedux;
} else if (channelData[sample] > previousSampleValue) {
  cumulativeGainReduxPercent += gainReduxPerSample;
  cumulativeGainReduxPercent = std::min(cumulativeGainReduxPercent, 1.0f);
  auto scaledRatio = ratio * cumulativeGainReduxPercent;
  scaledRatio = std::max(1.0f, scaledRatio);
  cumulativeGainRedux = (channelData[sample] - threshold) * (1 - (1 / scaledRatio));
  channelData[sample] -= cumulativeGainRedux;
} else {
  // We're still above the threshold, but the sample value is getting smaller
}
Next, we use the same calculations as before for our cumulative gain reduction percentage, scaled ratio, and cumulative gain reduction amount…with one change. We're going to rename our gain reduction amount to better indicate that it will be the max possible instantaneous gain reduction for that samples magnitude.
if (std::abs(channelData[sample]) < threshold)
{
  cumulativeGainReduxPercent -= gainRecoveryPerSample;
  cumulativeGainReduxPercent = std::max(cumulativeGainReduxPercent, 0.0f);
  cumulativeGainRedux -= cumulativeGainRedux * gainRecoveryPerSample;
  channelData[sample] -= cumulativeGainRedux;
} else if (channelData[sample] > previousSampleValue) {
  cumulativeGainReduxPercent += gainReduxPerSample;
  cumulativeGainReduxPercent = std::min(cumulativeGainReduxPercent, 1.0f);
  auto scaledRatio = ratio * cumulativeGainReduxPercent;
  scaledRatio = std::max(1.0f, scaledRatio);
  cumulativeGainRedux = (channelData[sample] - threshold) * (1 - (1 / scaledRatio));
  channelData[sample] -= cumulativeGainRedux;
} else {
  // We're still above the threshold, but the sample value is getting smaller
  cumulativeGainReduxPercent += gainReduxPerSample;
  cumulativeGainReduxPercent = std::min(cumulativeGainReduxPercent, 1.0f);
  auto scaledRatio = ratio * cumulativeGainReduxPercent;
  scaledRatio = std::max(1.0f, scaledRatio);
  maxInstantaneousGainRedux = (channelData[sample] - threshold) * (1 - (1 / scaledRatio));
}
Then we reduce the cumulative gain reduction amount by the same percentage of gain recovery per sample that we calculated earlier.
cumulativeGainRedux -= (cumulativeGainRedux * gainRecoveryPerSample);
Lastly, we see which is bigger: the cumulative gain reduction amount, or the max possible gain reduction amount for that samples magnitude. Whichever is bigger is our new cumulative gain reduction amount and it's subtracted from the sample.
cumulativeGainRedux = std::max(maxInstantaneousGainRedux, cumulativeGainRedux);
channelData[sample] -= cumulativeGainRedux;
Put all together, it looks like this:
auto gainReduxPerSample = 1.0f / (sampleFreq * attackTime);
auto gainRecoveryPerSample = 1.0f / (sampleFreq * releaseTime);

float tempStorageVar;
float maxInstantaneousGainRedux;

for (int sample = 0; sample < buffer.getNumSamples(); ++sample)
{
  channelData[sample] = buffer.getSample(channel, sample) * inputGain;

  tempStorageVar = channelData[sample];

  if (std::abs(channelData[sample]) < threshold)
  {
    cumulativeGainReduxPercent -= gainRecoveryPerSample;
    cumulativeGainReduxPercent = std::max(cumulativeGainReduxPercent, 0.0f);
    cumulativeGainRedux -= cumulativeGainRedux * gainRecoveryPerSample;
    channelData[sample] -= cumulativeGainRedux;
  } else if (channelData[sample] > previousSampleValue) {
    cumulativeGainReduxPercent += gainReduxPerSample;
    cumulativeGainReduxPercent = std::min(cumulativeGainReduxPercent, 1.0f);
    auto scaledRatio = ratio * cumulativeGainReduxPercent;
    scaledRatio = std::max(1.0f, scaledRatio);
    cumulativeGainRedux = (channelData[sample] - threshold) * (1 - (1 / scaledRatio));
    channelData[sample] -= cumulativeGainRedux;
  } else {
    cumulativeGainReduxPercent += gainReduxPerSample;
    cumulativeGainReduxPercent = std::min(cumulativeGainReduxPercent, 1.0f);
    auto scaledRatio = ratio * cumulativeGainReduxPercent;
    scaledRatio = std::max(1.0f, scaledRatio);
    maxInstantaneousGainRedux = (channelData[sample] - threshold) * (1 - (1 / scaledRatio));
    cumulativeGainRedux -= (cumulativeGainRedux * gainRecoveryPerSample);
    cumulativeGainRedux = std::max(maxInstantaneousGainRedux, cumulativeGainRedux);
    channelData[sample] -= cumulativeGainRedux;
  }

  previousSampleValue = tempStorageVar;
}
The only thing left to do is update the display for the new attack and release knobs.
I wish that I had an amazing compressor plugin to release and show the world, but I don't. The compressor itself works, but isn't really that great; it still has distortion and doesn't compress as noticeably as I would have hoped. In fact, all of the compressing math that I did could be replaced with one call to the JUCE DSP compressor module and it would have worked so much better.
But that's okay. Making an amazing compressor algorithm from scratch (in terms of mathematics and implementation) wasn't the goal.
Learning and finishing was…and I did that.
I learned a lot about JUCE, C++, and audio programming. And I'm proud of that.
If you made it through this crazy-long post, then thank you for spending some time here. I hope you enjoyed it and learned something yourself.
[1] A sample is a value used to represent a singular point of a sound wave. Most of the time there are 44100 or 48000 samples for every second of recorded sound.
[2] A buffer contains a chunk of sequential samples grouped together to be processed all at once.
[3] Humans hear in approximately logarithmic fashion. What this means is that every 10 dB increase in volume is double in the perceived volume. So going from 0 dB to 10 dB means it's perceived as being twice as loud.
[4] This functionality is usually in a separate plugin called a limiter.
[5] This actually isn't entirely true. Attack times may be measured in the time it takes to get to 63% attenuation or to go from 10% attenuation to 90%. For simplicity, I'll define it as the time it takes to go from 0% compression to 100%.